Daylight Planning in New Builds: What Architects Pay Attention To
In new-build projects, daylight is not a matter of luck but something that can be planned through orientation, building spacing, window sizes, and shading analysis. This article explains how architects and developers design lighting concepts, which documents buyers should request when purchasing off-plan, and how future light conditions can be assessed before construction even starts using monthly maps, shadow maps, and sun paths.
12.03.2026
Why Daylight Planning Matters So Much in New Builds, and Why It Can Be Checked in Advance
Daylight helps determine whether rooms feel generous or cramped, how well a home office works, how often a balcony is actually used, and whether children's rooms are bright in the afternoon. What makes new builds special is that many of these effects can already be influenced during the planning phase and, for buyers, checked in advance as well. In existing buildings, light is often experienced as something given. In a new build, light is the result of geometry and context working together: orientation, room depth, window area, parapets, balconies, neighboring buildings, terrain, and possible densification in the district. The earlier these factors are considered consciously, the fewer surprises there will be after moving in. For buyers purchasing off-plan, daylight is therefore a classic due-diligence topic. It affects quality of life directly and remains relevant for years, often decades. For agents and professionals, it is also a consulting topic because poor light quality is one of the most common causes of disappointment after moving in, even when the fittings and floor plan are otherwise right.
- ✓ Define daylight as a mandatory criterion: which rooms need to be bright, and at what times of day, morning, midday, afternoon, or evening?
- ✓ When buying off-plan, take daylight documents as seriously as the floor plan, construction specification, and energy indicators.
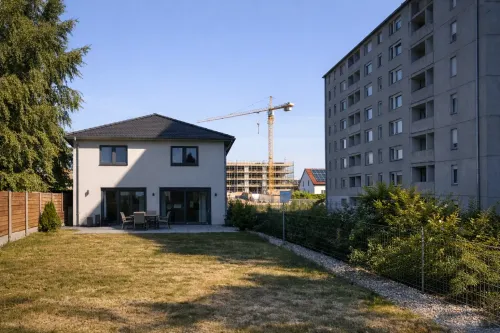
Orientation and Urban Placement: How the Position of the Building Shapes the Lighting Concept
When architects think about daylight, they often do not start with the window but with the building mass itself: where the building sits on the site, how it is turned toward the sun, and how the facades are assigned to the cardinal directions. The basic logic is simple. East tends to bring morning light, south often delivers the strongest direct solar exposure across the day, west shifts the light window toward the afternoon and evening, and north usually receives less direct sun but can still provide even skylight if the surroundings are open enough. In new builds, what matters is how the main rooms are positioned. Living and dining areas usually benefit from reliable daylight windows, bedrooms can be placed in calmer and cooler positions depending on preference, and home office spaces need glare and heat comfort. Professional daylight planning therefore does not assume that there is one single best orientation. Instead, it assigns functions to the most suitable light windows. For buyers, this is an important shift in perspective. The question is not only where the balcony is, but which rooms are on which side and how that fits daily life. Families benefit especially when living areas are not permanently in shade while secondary rooms take the weaker light zones.
- ✓ Check room function against orientation: evaluate living room, home office, and children’s room separately, not just the balcony.
- ✓ For north-facing units, look for openness. North can work if plenty of skylight reaches the facade and the situation is not a narrow canyon.
Building Spacing, Heights, and Courtyards: Why Context Is Often More Important Than Window Size
In dense development, the deciding factor is often not the amount of glazing, but the distance to the next building mass and that building’s height. Large windows are of little use if a tall building stands opposite and blocks the sun during the decisive hours. Typical daylight risks in new-build projects include street canyons, where tall buildings on both sides create long shadows, especially in winter when the sun is low; courtyard situations, which may be quiet but often lose skylight in dense districts, so depending on courtyard width and building height the available light window can shrink dramatically; and setbacks and balconies, where projecting balconies or deep loggias can shade the unit itself. That self-shading is not automatically bad because it can improve summer comfort, but it has to be planned consciously. Architects therefore often try to create light corridors through sensible spacing, staggered heights, sight lines, offsets, and courtyard geometry that allows direct or at least generous diffuse light for part of the day. For buyers and agents, this is something that can be checked well. Do not only study the floor plan. Study the planned surroundings as well: how tall will the building opposite be, how wide is the gap between them, are there existing trees or buildings that will remain, and is further densification possible?
- ✓ Do not automatically treat a courtyard location as an advantage. Courtyard width and building height determine whether it will be bright or permanently shaded.
- ✓ Check self-shading: loggias, deep balconies, and overhangs can improve summer comfort but reduce winter light.
Window Planning, Room Depth, and Floor Plan: How Daylight Actually Reaches the Interior
Daylight quality does not end at the facade. Two apartments with the same orientation can feel completely different inside depending on how deep the rooms are, how the windows are proportioned, and whether light can travel through several spaces. Important planning levers include room depth, because the deeper a room is, the faster brightness drops away. Open-plan kitchen and living areas often feel brighter than equally large but heavily subdivided layouts. Window proportions and parapet heights also matter. High parapets reduce how light spreads through the room, while larger glazed areas, for example floor-to-ceiling windows, can carry light deeper into the interior. Cross-ventilation and multi-sided exposure matter too. Rooms with windows on two sides, or at least side openings, often have significantly better daylight quality. Surfaces and furnishing also play a role. Light-colored surfaces reflect light, while dark materials absorb it. That is not a substitute for good planning, but it can amplify or weaken the effect. For buyers purchasing off-plan, the decisive point is this: renderings often show the best possible light. Planning documents and shading studies are the more objective basis. Anyone who combines room depth and window position in the floor plan with the planned light windows can recognize early whether rooms will be naturally usable during the day or whether artificial lighting will be needed all the time.
- ✓ Check the floor plan for room depth: deep, narrow rooms lose daylight faster, especially in courtyard-facing situations.
- ✓ Recognize multi-sided exposure as a quality feature: it produces more even and more usable daylight.
Which Documents Buyers Should Request: Shading Studies, Sun Position, and Monthly Comparisons
Anyone buying off-plan should not just talk about daylight but document it. Useful documents and questions include shading studies, ideally at least for summer and winter, to show how shadows move throughout the day; monthly or seasonal representations to reveal the pattern of bright in summer, dark in winter early on; representations of the surroundings including building heights, distances, planned building masses, and relevant existing structures; and a concrete assessment of the most important usable areas such as balcony or loggia, living room, home office, and children’s room. The practical rule is simple. If a project is marketed heavily with claims such as bright or large windows, there should also be a robust shading representation that supports those claims across several months and times of day.
- ✓ Ask for at least a summer and a winter representation. That is the only way seasonal shading becomes visible.
- ✓ Do not assess only the building as a whole, but the specific unit: floor level, courtyard or street side, loggia depth, and parapet height.
Relocheck in the Planning Phase: How Sunshine-Hour and Shading Visualizations Back Up Architectural Decisions
The Relocheck sunshine-hours and shading module is especially useful in planning because it does not describe light as a feeling, but as patterns in maps and tables that can be interpreted across months. First, the shadow map as a heatmap from blue to white. The report explains this display as a color gradient from blue to white, with white marking the highest amount of light. In the planning phase, this works as a context map. Are there stable shadow zones in the district? Does the site sit on a shadow edge where small changes in placement, building height, or courtyard geometry can have large effects? Second, the monthly maps. The report explains that separate maps are created for each month because solar position and daylight quantity vary from month to month. In planning, that is especially relevant for checking winter suitability. A concept may look very good in summer and still lose a great deal in winter because the sun is lower. Third, the table by cardinal direction, north, south, east, and west. This breakdown by facade side helps compare design variants. Which sides provide the light windows for living spaces, and which sides should take secondary rooms instead? Fourth, the sun-path horizon display using solid versus dotted lines. The report explains the logic: solid lines mean direct sunlight is geometrically possible because the sun path lies above obstacles, while dotted lines mean it is blocked by terrain or buildings. In early phases, this is a strong tool for checking whether neighboring buildings or terrain horizons block central sun windows. One important point for interpretation is that the report also notes such maps do not account for variables such as cloud cover and tree cover. That matters in planning and purchasing. The maps show the structural geometry of buildings and terrain, while trees and weather need to be added as a separate reality. For professionals such as agents, developers, and project managers, the added value lies above all in traceability. Light quality becomes comparable through identical modules, both between sites and between design variants. For buyers, this creates transparency. You can understand why a unit is bright, or why it is not.
- ✓ Compare design variants by month. Do not check version A versus B only in summer, but in winter as well.
- ✓ Use the sun-path rule: solid means possible, dotted means blocked. Identify blockers such as buildings or terrain early.
Red Flags When Buying Off-Plan: How to Spot Potentially Dark Units Early
Some patterns appear especially often in new-build projects and can be recognized early. Deep loggias with already limited light windows may feel pleasant in summer but can strongly reduce winter light. A courtyard with tall perimeter buildings and a narrow width is often quiet but prone to permanent shade. North-facing main living spaces without compensation are another warning sign. If the living room and home office are predominantly north-facing and the surroundings are dense, the risk of relying permanently on artificial light increases. Tall neighboring development in critical solar directions is also problematic. Even a good orientation is of little value if the sun path is frequently blocked. And brightly lit marketing renderings without robust shading documents should always be treated with caution. These red flags are not automatic exclusion criteria. But they are signals that closer checking is needed, ideally with seasonal representations and one clear question: is the light quality sufficient for my daily life, especially during the darker months of the year?
- ✓ Courtyard plus tall perimeter development plus narrow courtyard width equals higher risk of winter darkness.
- ✓ If documentation is missing, actively request shading studies instead of relying on renderings.
Practical Guide: How Buyers and Professionals Can Check Daylight Clearly and Comparably
To keep daylight planning from remaining abstract, a clear review routine helps. Step one, define the usage profile: which rooms are decisive, such as living and dining area, home office, children’s room, or balcony, and at what times of day should they be bright? Step two, check the context: building distances, heights, courtyards, and possible blockers in the relevant solar directions. Step three, check the seasons: compare at least one summer month and one winter month so you can identify the risk pattern of excellent in summer, dark in winter. Step four, create evidence: read the maps, table, and sun paths in a way that makes clear whether direct sun is possible or structurally blocked. Step five, compare units: do not compare project against project, but unit against unit, using the same logic throughout. For agents and professionals, this routine has an additional benefit. It reduces follow-up questions, raises consulting quality, and creates traceable documentation that stabilizes client decisions. For buyers, it produces a fair comparison, especially when several new-build projects are under consideration.
- ✓ Standardize unit comparisons: the same months, the same rooms, and the same times of day are what make light truly comparable.
- ✓ Separate direct sun from skylight and decide what matters more in your daily life: warmth and solar gain or even brightness.